Project Elephant Fish Update 2

In this week I found a problem with the power supply in my  electronics set up. Originally, my idea was to power this device with a 3.7V lithium ion battery, but after some testing I found the voltage from the battery to be too low to power my servo motor. The problem stemmed from the  fact that the servo motor is ratted at a higher 4.8V. At this nominal voltage, the motor draws around 100 to 300 mA of current. However if I try to run the motor at a lower voltage, the motor will try to consume more more current to output the same amount of power. Power is equals to voltage times current so when I lowered the voltage the motor consumes up to 400 mA or more amount of current. This seems so be more than the battery I have can handle.

Battery Requirements

After discussing this issue with my professor, it was agreed that I need to specify some important requirements for the battery. First of all I must make sure the voltage is high enough to support the motor. Second, I need to make sure the battery life is large enough to last through an entire day. It will be pointless to have a device that can only last a few hours. If this device is to be used in every day life it must at least work through 8 or more hours of continuous use. Since the maximum current draw for the motor at the nominal 4.8V is around 300 mA, I would need a power source that can provide at least 2000 mAh to get the 8 hours of continuous usage that I need. Also, in order to make this device easier to handle by the visually impaired, the batteries would also have to be rechargeable so that the user does not have to mess around with the inner components of the device.

New Power Source Set up

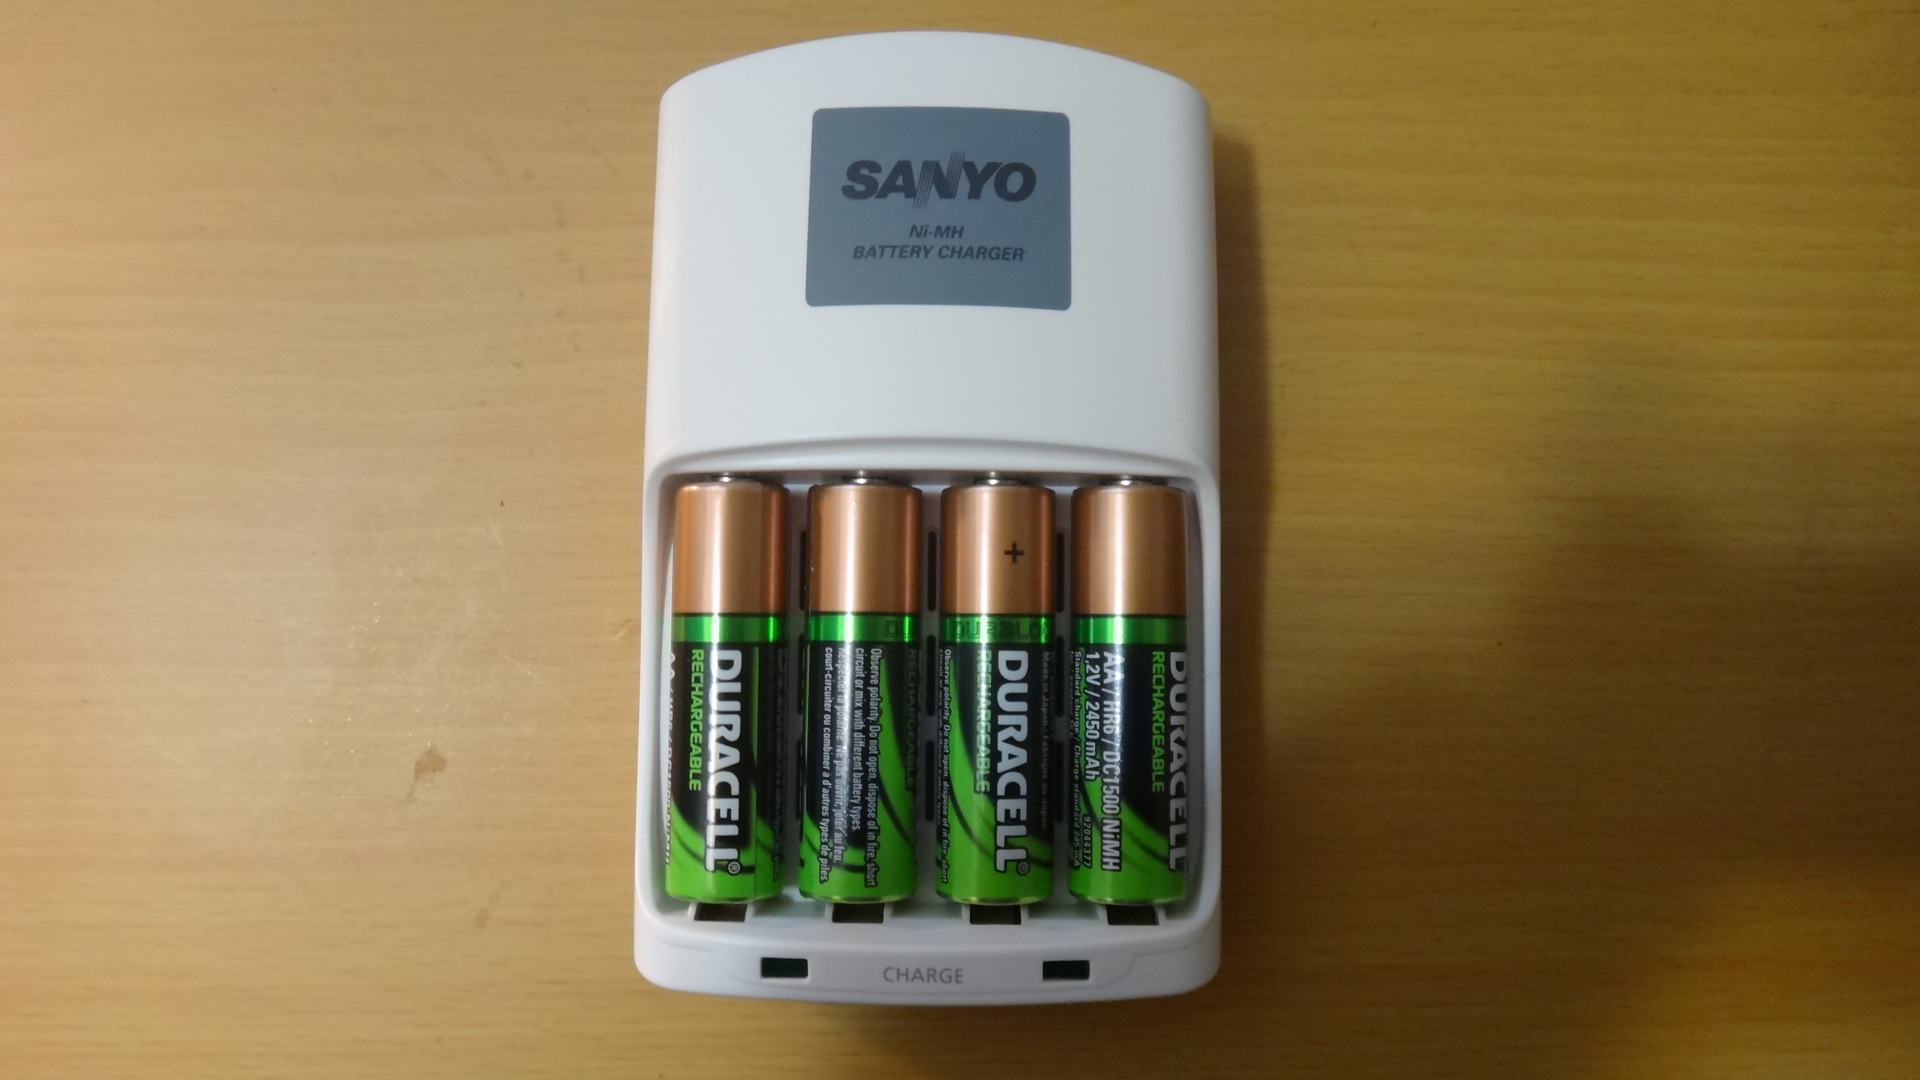
After giving this problem some thought, a good solution to this problem would be to use regular rechargeable AA Ni-MH batteries. They are commercially available, very inexpensive to buy, and often comes with a battery charger. You can purchase a complete set on ebay of less than $15. Since each AA Ni-Mh battery only contains 1.2V, I will need 4 batteries connected in series to get the nominal 4.8V to power the motor. However this also works out since most battery chargers can only charge 4 batteries at a time. I already have an unused 4 battery charger at home so all I need now are the batteries. The 4 pack of batteries that I purchased are from Duracell and they provide up to 2450 mAh per charge. This is fantastic because that’s just the amount of battery life that I need for this project.

007


Upcoming Tasks

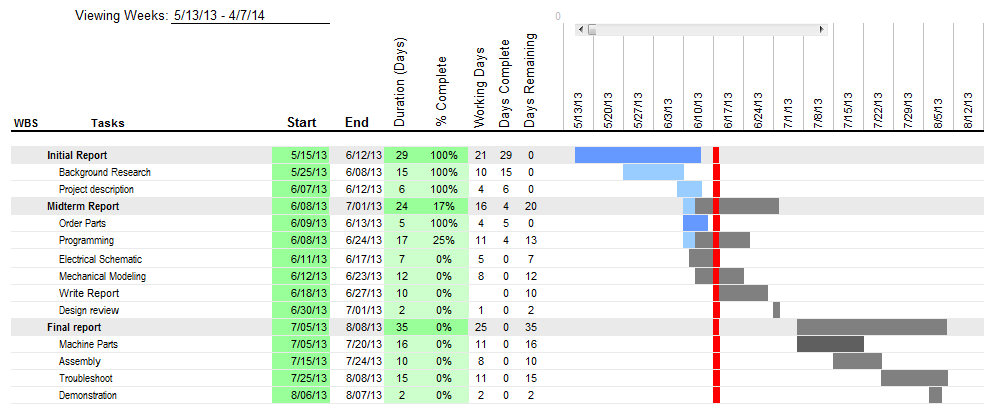
Now that the power supply and the electronic components are figured out, I need to start modelling the mechanical housing that will store all these components. Switching the power supply is a big change in my design and will require some hacking of the battery charger to make it fit with my device. I am aiming to do some mechanical models for the upcoming weeks. The updated gant chart for my progress is shown below.

Capture3


Project Elephant Fish Update #1

A lot of progress has been made this week for the haptics project! The workflow for the Arduino IDE has been setup, all of the necessary parts were ordered, and I even got a bit of programming for the servos done. Working with the Arduino IDE again after switching from Eclipse is a bit of a pain. I have always worked with Eclipse to do my Arduino programming but since the Arduino app came out for the Android mobile devices I was a bit curious on how it would perform on my Nexus tablet. Props to those guys who worked to get it on that platform 🙂

Preparing the Arduino IDE Workflow

This is just a short guide on how I like to set up my workflow on the Arduino IDE platform. I’m used to programming with classes on the Eclipse IDE so I was really surprised to find out that you can’t simply include your classes in the Arduino IDE and have it all work. What you need to do is to create your own custom libraries. The Arduino IDE has an option to import custom libraries through the menu: Sketch > Import Library. This functionality makes a copy of the folder you chose and places it in your default windows folder: My Documents\Arduino\libraries\. So if you want your classes to be more self contained, you’ll have to change this directory by modifying your sketchbook directory in File Preferences.

Capture

After that is done, create a folder in your sketchbook directory named “libraries” if it hasn’t been done so already. From now on, any c++ files you place in the “libraries” folder can be included on your .pde file as a custom library. One important note is that the .pde file must contain all the includes in your custom library. When the IDE compiles, it makes a temporary folder and copies of all the includes you’ve listed . If your include files are not all listed in the .pde you will get file missing errors.

Bill of Materials

The parts for the project is finally finalized! The biggest change I made to the design so far is that I removed the vibrator component completely. I did this after realizing that I can simulate vibrations using the servo motor instead which allows me to make the device smaller, less complicated, and less expensive. The bill of materials for this project is presented to you below.

Capture

I was able to source out a couple of items on this list. The items highlighted are being ordered. I even put together a small demo to see if everything comes together. It’s looking good so far.

061

Gant Chart

Due to the time constraints I have for this project I was advised to set up a Gant Chart and some milestones for myself. Hopefully this will keep motivated  till the end of my project. My goal for this week is to start on the electronic schematic and the mechanical modelling.

Capture2

New Projects Ahoy!

So it’s been awhile since my last post! I am currently working two new projects which I will keep up to date on this site. The first project that I would like to share with you is the my plastic extruder project for the 3D printer in our lab. This project is going to between me and my fellow colleague Josh. There are a couple of DIY plastic extruders already out there  but our goal is to design a plastic extruder that is affordable, mostly 3D printed, and can recycle our used plastic parts. This means simplifying the design and making it easy for anyone to assemble. You can view our initial report for this project here.

The second project I want to introduce is going to be a more personal project of mine involving haptics. The term “haptics” refers to any kind of computer generated touch. A good example of this is the vibration feedback you get when you touch a key on a touch screen or the rumble on a joystick for a video game. The haptics project I will be working on involves creating a haptic driven navigation device for the visually impaired. It will be a simple hand held device that will relay range data to the user in the form of tactile touch and force feedback. I am currently working alone on this project so progress is not as fast as I would like it to be.

For my final thoughts, I would like to give cool names for these projects. Stay tuned for new  updates on Project Xtruder and Project Elephant Fish!