In the previous part, we’ve set up a responsive game canvas that fits most screen configurations, now we are going to build on that and add a button that the user can interact with. The goal here is to make the button accessible to all sorts of inputs, mouse, touch, and keyboard.
To begin, copy the helloWorld.html document we’ve made in the previous part and paste it into a new folder called buttons. Rename the helloWorld.html to buttons.html and change its <title> tag accordingly.
Adding CSS
Let’s start by defining the containers that house the buttons. We want the buttons to be an overlay over everything and appear on the corners of the screen. For that we will use fixed positioning with a high z-index and space between content. Copy the styles below and paste it into your CSS code.
.trf_BottomControl {
    position: fixed;
    bottom: 30px;
    left: 30px;
    right: 30px;
    display: flex;
    align-items: center;
    justify-content: space-between;
    z-index: 1000;
}Code language: CSS (css)
Now we will add the style for the button itself. It is important to have user-select so that default mouse and touch actions do not interfere with the actual pressing of the button. We also created a ButtonActive class to change the button color when the button is pressed.
.trf_Button {
width: 80px;
height: 80px;
background: rgba(100, 200, 255, 0.2);
border: 2px solid rgba(100, 200, 255, 0.5);
border-radius: 50%;
display: flex;
align-items: center;
justify-content: center;
font-size: 48px;
font-family: Arial, Helvetica, sans-serif;
color: white;
-webkit-user-select: none; /* Safari */
user-select: none;
transform: scale(1);
}
.trf_ButtonActive {
background: rgba(100, 150, 255, 0.9);
transform: scale(0.95);
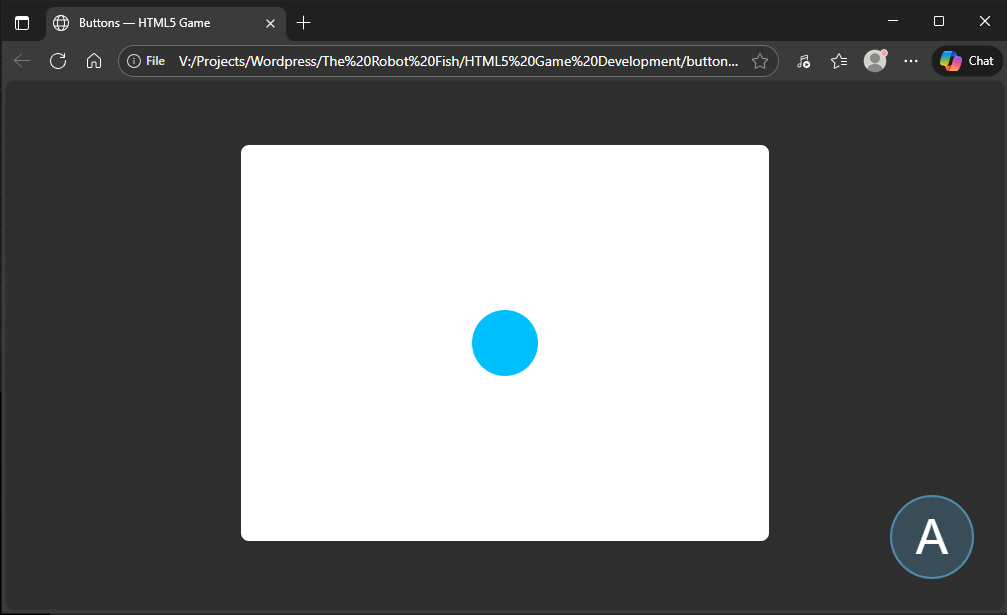
}Code language: CSS (css)Finally, we will add the elements to the html body. Copy the code below to the section reserved for the bottom overlay. We will give it an id="trf-buttonBR" which will be used later.
<div class="trf_BottomControl">
    <div></div>
    <div class="trf_Button" id="trf-buttonBR">A</div>
</div>Code language: HTML, XML (xml)
Here’s the result:
Creating the Button Object
Now that we’ve created our button, we have to write some JavaScript code to interact with it. The best way to do that is to create an object for it so it can be reused in other places. Below is a basic template for a button object that we will be using. Copy this and paste it under our <script> tag before anything else.
/* Initialize TRF (The Robot Fish) namespace */
this.trf = this.trf||{};

(function() {
    "use strict";

    function Button() {
        // insert constructor here
    }
    var p = Button.prototype;
    createjs.EventDispatcher.initialize(p);

    // insert functions in here

    trf.Button = Button;

}());Code language: JavaScript (javascript)
In this template, we use the function wrapper to keep variables enclosed and to have the anonymous function run right away. "use strict"; is implemented to catch errors.
(function() {
    "use strict";
}());Code language: JavaScript (javascript)
The trf is used as the identifier to prevent the namespace from getting too polluted.
this.trf = this.trf||{};Code language: JavaScript (javascript)We also use the CreateJS EventDispatcher class to inject listener functionality so we can dispatch our own custom events.
createjs.EventDispatcher.initialize(p);Code language: CSS (css)The var p is there to store the Button prototype so we can use it to add our functions later.
var p = Button.prototype;Code language: JavaScript (javascript)Finally, we add the button object to the trf using this:
trf.Button = Button;Building the Constructor and Functions
The constructor of an object runs once when the object is instantiated. It is used to initialize and set object variables.
When we create the new object, we pass in the Id for the button element, the button active style class, and the keyboard keys that will be tied to the button.
Replace the constructor with the new one below.
function Button(elementId, activeStyle, keys) {
    this.elementId = elementId;
    this.activeStyle = activeStyle;
    this.keys = keys;

    this.element = null;
    this.isPressed = false;
    this.activeControl = "";

    this.activate();
};
Code language: JavaScript (javascript)
Now we add the functions that will make the Button work. Insert these function templates into the Button object.
p._onPressAction = function(){
    //private action on press
};

p._onReleaseAction = function(){
    //private action on release
};

p.activate = function(){
    //attach element, set visible, and add listeners
};

p.handleOnPressPointer = function(event){
    //handle pointer down event
};

p.handleOnReleasePointer = function(event){
    //handle pointer release event
};

p.handleOnPressKeyboard = function(event){
    //handle keyboard press event
};

p.handleOnReleaseKeyboard = function(event){
    //handle keyboard release event
};

p.destroy = function(){
    //remove element, set not visible, and remove listeners
};Code language: JavaScript (javascript)
Activate and Destroy Function
We start by defining the activate() function. The purpose of this function is to set the html element the button is attached to, set the element to visible, and add the event listeners.
The activate function is first called in the constructor but may be called later after the Button has been disabled by the destroy() function. Replace the activate function with the code below:
p.activate = function(){
    if (this.element === null) {
        this.element = document.getElementById(this.elementId);
        this.element.style.visibility = "visible";

        <mark style="background-color:rgba(0, 0, 0, 0)" class="has-inline-color has-contrast-color">this.handleOnPressPointerBind = this.handleOnPressPointer.bind(this);
        this.handleOnReleasePointerBind = this.handleOnReleasePointer.bind(this);</mark>

        this.handleOnPressKeyboardBind = this.handleOnPressKeyboard.bind(this);
        this.handleOnReleaseKeyboardBind = this.handleOnReleaseKeyboard.bind(this);

        this.element.addEventListener("pointerdown", this.handleOnPressPointerBind);
        this.element.addEventListener("pointerleave", this.handleOnReleasePointerBind);
        this.element.addEventListener("pointerup", this.handleOnReleasePointerBind);

        document.addEventListener("keydown", this.handleOnPressKeyboardBind);
        document.addEventListener("keyup", this.handleOnReleaseKeyboardBind);
    };
};Code language: JavaScript (javascript)
In the code above, we first check for the this.element being null to prevent duplication. We then set the this.element using the this.elementId that was passed into the constructor. We also set the style visibility of the element to "visible" in the case it was destroyed earlier and was "hidden".
if (this.element === null) {
    this.element = document.getElementById(this.elementId);
    this.element.style.visibility = "visible";Code language: JavaScript (javascript)
Next, we use the bind() function to bind the this keyword to the handle functions. The handle functions get passed into the listener callback, so without this binding, it will not understand where this needs to be pointed at. We save the anonymous functions created by the bind() so we can safely remove it later in the destroy() function.
this.handleOnPressPointerBind = this.handleOnPressPointer.bind(this);
this.handleOnReleasePointerBind = this.handleOnReleasePointer.bind(this);

this.handleOnPressKeyboardBind = this.handleOnPressKeyboard.bind(this);
this.handleOnReleaseKeyboardBind = this.handleOnReleaseKeyboard.bind(this);Code language: JavaScript (javascript)
Finaly, we add the event listeners. We used the pointer events because they encapsulate both mouse and touch interactions. For simplicity we used the release handle for the pointer on both the "pointerleave" and "pointerup" events.
For the keyboard control we have to add the listener to the document so that it can be captured all the time. We will have to be careful in handling the event, so it doesn’t fire on non-related key presses.
this.element.addEventListener("pointerdown", this.handleOnPressPointerBind);
this.element.addEventListener("pointerleave", this.handleOnReleasePointerBind);
this.element.addEventListener("pointerup", this.handleOnReleasePointerBind);

document.addEventListener("keydown", this.handleOnPressKeyboardBind);
document.addEventListener("keyup", this.handleOnReleaseKeyboardBind);Code language: JavaScript (javascript)
Finaly, we implement the destroy() function accordingly. Replace the destroy() function with the code below.
p.destroy = function(){
    this.element.removeEventListener("pointerdown", this.handleOnPressPointerBind);
    this.element.removeEventListener("pointerleave", this.handleOnPressPointerBind);
    this.element.removeEventListener("pointerup", this.handleOnReleasePointerBind);

    document.removeEventListener("keydown", this.handleOnPressKeyboardBind);
    document.removeEventListener("keyup", this.handleOnReleaseKeyboardBind);

    this.element.style.visibility = "hidden";

    this.isPressed = false;
    this.element = null;
};Code language: JavaScript (javascript)
Handle Functions
Now that we added the listeners, it is time to define the handle functions. We start with the pointer handlers. Replace the functions in the template with the following code.
p.handleOnPressPointer = function(event){
    if (this.isPressed === false){
        this.activeControl = "pointer";
        this._onPressAction();
    };
};

p.handleOnReleasePointer = function(event){
    if (this.isPressed === true){
        if (this.activeControl === "pointer"){
            this._onReleaseAction();
        };
    };
};Code language: JavaScript (javascript)
The first thing to do in the handlers is to check the this.isPressed state of the button. This is important to prevent interference with the keyboard actions. Only on the press events do we set the this.activeControl, which will lock in the control type until release.
If all the checks pass, we then execute the private action functions. The underscore _ is just for notation and readability only. We will use these functions to add or remove the active style and also dispatch out own custom onPress and onRelease events which we will listen for later.
Let’s define these private functions by replacing them in our template with this below:
p._onPressAction = function(){
    this.element.classList.add(this.activeStyle);

    this.isPressed = true;
    this.dispatchEvent("onPress");
};

p._onReleaseAction = function(){
    this.element.classList.remove(this.activeStyle);

    this.isPressed = false;
    this.dispatchEvent("onRelease");
};Code language: JavaScript (javascript)
Finaly, we finish this off by adding the keyboard listeners.
p.handleOnPressKeyboard = function(event){
    if (this.isPressed === false){
        if (this.keys.includes(event.key)) {
            this.activeControl = "keyboard";
            this._onPressAction();
        };
    };
};

p.handleOnReleaseKeyboard = function(event){
    if (this.isPressed === true){
        if (this.activeControl === "keyboard"){
            if (this.keys.includes(event.key)){
                this._onReleaseAction();
            };
        };
    };
};Code language: JavaScript (javascript)
It is very similar to the pointer handlers except; we also have the added check of the key press by looking for the event.key in the array this.keys that was passed in.
if (this.keys.includes(event.key)){Code language: CSS (css)Finishing Up
Now that our Button Class is ready, all we have to do is use it. Replace the entire main program with the following code:
var button, vel = 0;
var stage,circle;

function init() {
    stage = new createjs.Stage("trf-gameCanvas");
    circle = new createjs.Shape();
    button = new trf.Button("trf-buttonBR",
                            "trf_ButtonActive",
                            ["a", "A", " "]);

    circle.graphics
        .beginFill("DeepSkyBlue")
        .drawCircle(0, 0, 50);
    circle.x = 400;
    circle.y = 300;

    button.addEventListener("onPress", function(event){
        vel = -2;
    });
    button.addEventListener("onRelease", function(event){
        vel = 1;
    });

    createjs.Ticker.framerate = 60;
    createjs.Ticker.on("tick", tick);

    stage.addChild(circle);

    window.removeEventListener("load", init);
}

function tick(event) {
    circle.y += vel;
    stage.update(event);
}

window.addEventListener("load", init);Code language: JavaScript (javascript)
A couple of things to note for the code above; first, we add a new button and velocity variable:
var button, vel = 0;Code language: JavaScript (javascript)Next, we create a new button object with the element id, the active button CSS class and a list of buttons to bind to. We’ve chosen the a, A, and space keys.
button = new trf.Button("trf-buttonBR",
                        "trf_ButtonActive",
                        ["a", "A", " "]);Code language: JavaScript (javascript)
Then we add the listeners for our custom button events. Here we are setting the velocities.
button.addEventListener("onPress", function(event){
    vel = -2;
});
button.addEventListener("onRelease", function(event){
    vel = 1;
});Code language: JavaScript (javascript)
After that, we add a ticker event that fires 60 frames per second.
createjs.Ticker.framerate = 60;
createjs.Ticker.on("tick", tick);
Code language: JavaScript (javascript)
Finaly, we add the tick event handler itself to update the circle position and draw the objects.
function tick(event) {
    circle.y += vel;
    stage.update(event);
}Code language: JavaScript (javascript)
And we are done! We now have a button object that is responsive to mouse, touch and keyboard, and we can add as many of them as we want. In the next part, we will take what we have here and build a simple game.
You can try the button demo here.
You can download the project files here.